Saturday, July 30, 2011

Ubuntu 11.04 - Natty Narwhal Review


The naming of Ubuntu 11.04 was announced on 17 August 2010 by Mark Shuttleworth. Its release is planned for 28 April 2011. Ubuntu Desktop will use the Unity user interface instead of GNOME Shell as default. The move to Unity is controversial as some GNOME developers fear it will fracture the community and marginalize GNOME Shell.
Ubuntu 11.04 will use Banshee as the default music player, replacing Rhythmbox. Other new applications will include Mozilla Firefox 4 and LibreOffice, which has replaced OpenOffice.org.
Starting with Ubuntu 11.04 the Ubuntu Netbook Edition has been merged into the desktop edition.


There has been many changes in the Default application selection in the upcoming Ubuntu 11.04 Natty Narwhal from Ubuntu 10.10. Here’s some new features:
- Unity as been confirmed as default for Ubuntu 11.04 – desktop edition, the desktop version will use the global menu (AppMenu).


- LibreOffice will likely be included in next version of Ubuntu if it’s ready
Firefox 4 is still favored over Chrome as the default browser in Ubuntu. Chrome still poses too many challenges for Ubuntu (the release cycle doesn’t fit well with Ubuntu Update model and also there are issues with the Global Menu integrations and so on).
- The decision to replace Evolution with Thunderbird in Ubuntu has been deferred. Hopefully Thunderbird will be ready in a cycle or two (it misses a calendar, exchange support, integration with appmenu and messaging menu).
Banshee will be included by default in Ubuntu 11.04 (and thus replace Rhythmbox)
Oneconf will be included by default in Ubuntu 11.04. OneConf is a mechanism for recording software information in Ubuntu One, and synchronizing with other computers as needed.
Gnome-dictionary will be removed from the CD
Nautilus Elementary was also brought up for discussion, but was rejected “because the patches are considered hacks”.
- In Natty Narwhal Software Center “For Purchase” category will be updated with more commercial software. And you will be able to sponsor your favorite app by donating any money amount to developers.


Numeric Keypad Not working in Ubuntu

Problem: Numeric keypad not working in Ubuntu

Solution:  Go intothe Keyboard Preferences (System>Preferences > Keyboard) and go to the Mouse Keys tab.simply uncheck the box for Allow tocontrol the pointer using the keyboard.
      
disable-keyboard-mouse.png

Network and Dial-Up Connections Icons May Be Missing

After you click Start, point to Settings, andthen double-click Network and Dial-up Connections, orRight-Click My Network Places on the desktop and selectproperties, you may experience one or more of the following symptoms:
  • The network adapter has a resource conflict with another device, causing the Local Area Connection icon not to be displayed. Note that Device Manager may incorrectly show the device to be working properly.
  • The Local Area Connection icon may be missing.
  • The Make New Connection icon may be missing.
  • When you double-click Make New Connection, you may receive the following error message:
Unable to create the specified connection. This can be causedby insufficient memory or not enough disk space.

CAUSE

This behavior can occur because of one or more of thefollowing reasons

This behavior can occur because of one or more of the followingreasons:
  • The Plug and Play service is not running, causing the Local Area Connection icon to not be displayed.
  • The Remote Procedure Call (RPC) service is not running, causing the Make New Connection icon to not be displayed.
  • You used the Dcomcnfg.exe tool to change DCOM default settings, causing the error message listed earlier in this article to be displayed.
  • One of the following network dlls is not properly registered.
    • Netcfgx.dll
    • Netman.dll
    • Netshell.dll

  • The Network Connections service is disabled or is not started, causing the Local Area Connection icon to not be displayed.

RESOLUTION

To resolve this behavior, use the appropriate method: VerifyThat the Device R...

To resolve this behavior, use the appropriate method:

Verify That the Device Resources Are Correct

To resolve this behavior:
  1. Obtain the network adapter configuration utility from the manufacturer of the network adapter. Typically, you must boot the computer from an MS-DOS or Windows 95/98 Startup disk to run these utilities.
  2. If the network adapter uses jumpers for its settings, verify that the settings do not conflict with another device and manually change them to a resource setting that is not currently in use.

    NOTE: You may need to remove all devices except the NIC and add them back one at a time to determine which device the network adapter conflicts with.

Start the Plug and Play Service

To resolve this behavior:
  1. Click Start, point to Programs, point to Administrative Tools, and then click Computer Management.
  2. Double-click Services and Applications, click Services, and then double-click Plug and Play.
  3. In the Startup type dialog box, click Automatic, click OK, and then restart your computer.

    NOTE: If the Local Area Connection icon is still missing, press F5 several times to refresh the screen. Also, you may try restarting your computer in Safe Mode with Networking.

Start the RPC Service

To resolve this behavior:
  1. Click Start, point to Programs, point to Administrative Tools, and then click Computer Management.
  2. Double-click Services and Applications, click Services, and then double-click Remote Procedure Call (RPC).
  3. In the Startup type dialog box, click Automatic, click OK, and then restart your computer.

    NOTE: If the RPC Service is disabled, you may need to use the Recovery Console. In Recovery Console, run Enable RPCSS Service_Auto_Start, and then restart your computer.

    NOTE: If the Make New Connection icon is still missing, press F5 several times to refresh the screen. Also, you may try restarting your computer in Safe Mode with Networking.

Reset Default DCOM Permissions

To work around this problem:
  1. Click Start, click Run, type dcomcnfg, and then click OK.
  2. On the Default Properties tab, click any setting other than Anonymous in the Default Impersonation Level box. The default setting is Identify.

Register the Following Dlls

  1. Click Start, click Run, and then type cmd.exe on the Open line.
  2. Type the following lines, and then press ENTER after you type each line:
3.     regsvr32 netshell.dll
4.     regsvr32 netcfgx.dll
5.     regsvr32 netman.dll
                                
  1. Restart the computer.

DISK PARTIONING IT @SCHOOL LINUX

  • First open terminal (Ctrl+Alt+t).
  • Install GNOME partition editor (sudo apt-get install gparted).
  • Now open it (System >Administration >Gparted partition editor). It may take several minutes.
Be careful, it is possible to lose your data if you delete or change the wrong partition.

Freeing Disk Space For New Partition

  • Select the device from the drop-down list at top right of window.
  • Now right-click on desired partition and choose Unmount.
  • To resize the partition choose Resize/Move. The dialog Resize/Move will be shown. You can use the Free Space Following (MiB) box to choose how much space to free after this partition, or Free Space Preceding (MiB) to free space before this partition.
  • Click Resize/Move to apply changes.

Create a New Partition

  • Select the device from the drop-down list at top right of window.
  • Right click on Unallocated partition and select New.
  • Choose the desired type of file system to use and click Add.
  • Click Apply to apply changes.
Click on edit and give the option apply changes.


Confirm file permission by checking the properties of the volumes.

Boot Parameters to Configure DEP and PAE

This topic explains how to use boot parameters to enable, disable, and configure Data Execution Prevention (DEP) and Physical Address Extension (PAE) on operating systems that support these features.
For information about the boot parameters for DEP on operating systems prior to Windows Vista, including operating system support and the default values of the parameters, see /noexecute and /execute. For similar information about PAE, see /pae and /nopae.
For information about the boot parameters for DEP and PAE on Windows Vista and later, see the BCDEdit /set command and the nx and pae options.
Important  DEP is a highly effective security feature that should not be disabled unless you have no alternative. The default settings for DEP and PAE are optimal for most systems. Do not change the default settings unless they interfere with essential processing tasks. This section is included to show you how to configure these features, but it should not be interpreted as a recommendation to change the default settings.

DEP and PAE Boot Parameters

On operating systems prior to Windows Vista, DEP and PAE are enabled at boot time and are configured by using the following four boot parameters:
On Windows Vista and later, DEP and PAE are enabled at boot time and are configured by setting values for the nx and pae parameters using the BCDEdit /set command.
These boot parameters have conflicting effects. To configure DEP and PAE, use only the parameter combinations that are described in the documentation for each parameter and discussed in this topic. Do not experiment with conflicting parameters, especially on a production system.

The Interaction of DEP and PAE Boot Parameters

There are two types of DEP:
  • Hardware-enforced DEP enables DEP for both kernel-mode and user-mode processes. It must be supported by the processor and the operating system.
  • Software-enforced DEP enables DEP only on user-mode processes. It must be supported by the operating system.
DEP is supported by Windows XP with SP2, Windows Server 2003 with SP1, Windows Vista, and later versions of Windows.
On 32-bit versions of Windows, hardware-enforced DEP requires PAE, which is supported by all Windows operating systems that support DEP. When DEP is enabled on a computer with a processor that supports hardware-enforced DEP, Windows automatically enables PAE and ignores the boot parameter values that disable it.
The parameter combinations for each Windows operating system are summarized in the following section.

DEP and PAE Parameter Combinations

The following list describes the boot parameter combinations that can be used to configure DEP and PAE.
Note   In the examples for Windows Vista and later, the optional {ID} is the GUID for the specific Windows boot loader boot entry that you want to configure. If you do not specify an {ID}, the command modifies the current operating system boot entry. For more information, see the BCDEdit /set command .
ActionPrior to Windows VistaWindows Vista and later
To enable DEP
(Select one parameter combination)
When DEP is enabled on computers that support hardware-enforced DEP, these parameter combinations also enable PAE.
/noexecute=alwayson/noexecute=optin/noexecute=optout
/set [{ID}] nx AlwaysOn
/set [{ID}] nx OptIn
/set [{ID}] nx OptOut
To enable DEP and PAE on systems with software-enforced DEP
(Select one parameter combination)
On computers that support hardware-enforced DEP, PAE is automatically enabled when you enable DEP.

/noexecute=alwayson /pae
/noexecute=optin /pae
/noexecute=optout /pae
/set [{ID}] nx AlwaysOn
/set [{ID}] pae default
/set [{ID}] nx OptIn
/set [{ID}] pae default
/set [{ID}] nx OptOut
/set [{ID}] pae default
To disable DEP, but enable PAE
/noexecute=alwaysoff /pae
(Windows XP with SP2)
/set [{ID}] nx AlwaysOff
/set [{ID}] pae ForceEnable
To disable DEP, but enable PAE

/noexecute=alwayoff
/noexecute=alwaysoff /pae
(Windows Server 2003 with SP1 only)
(These parameter combinations are equivalent.)
/set [{ID}] nx AlwaysOff
/set [{ID}] pae ForceEnable
To disable both DEP and PAE

/noexecute=alwaysoff
/noexecute=alwaysoff /nopae
(Windows XP with SP2)
(These parameter combinations are equivalent.)
/set [{ID}] nx AlwaysOff
/set [{ID}] pae ForceDisable
To disable both DEP and PAE


Source:technet magazine.Microsoft
/execute
(Windows Server 2003 with SP1 only)


How to export contacts from Outlook 2003, 2007 and Outlook Express


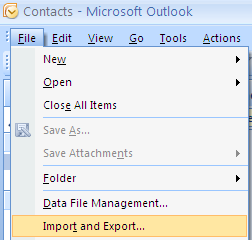
Let’s start with the latest and greatest version of Outlook, 2007! Note that the same procedure works for Outlook 2003. First open Outlook and then go to File and then Import and Export.
export contacts
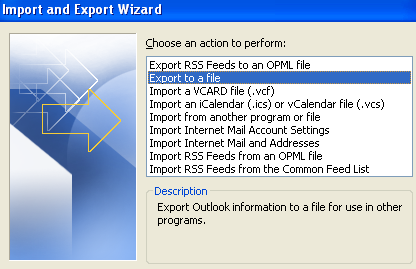
From the list, choose Export to a file and then click Next.
export to a file
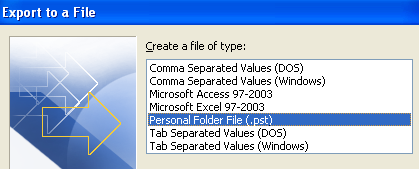
From the list, choose Person Folder file (.pst). I prefer to export it out as a PST file so that it can easily be imported into another Outlook, even of a different version.
personal folder file
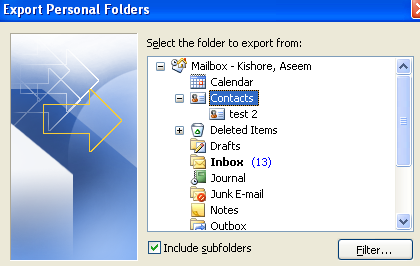
Now you’ll get a list of all of your folders, including the Inbox, Calendar, RSS feeds, etc. Click on Contacts since we want to export Outlook contacts only. If you have created other contact folders inside the main contact folder, be sure to check off the Include subfolders box.
export contact outlook 2007
Click Next and then choose the location for your backup file. Make sure to browse to some other location as Microsoft defaults to a hidden folder. Click Finish and you’re done!

How to export contacts from Outlook Express

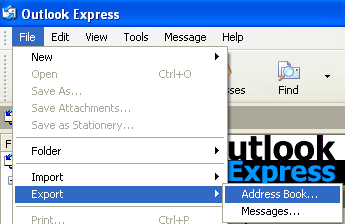
Outlook Express is slightly different, but pretty simple also. First, open Outlook Express and then go to File, choose Export, and then choose Address Book.
outlook express export contacts
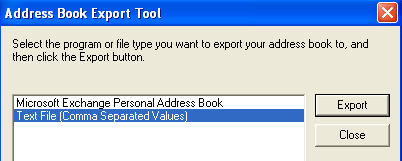
Click on Text File (Comma Separated Values) and then click Export.
outlook express export address book
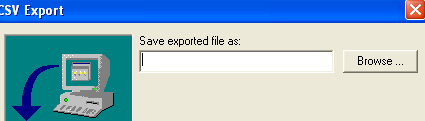
Click Browse to specify a location to save the file or type it in manually.
export contacts outlook
Click Next and then choose all of the fields that you want to export for each contact, i.e. First name, Email address, Street, Company, Phone, etc.
export contacts from outlook
Click Finish

Supply Memory Error' displays on the control panel HP LaserJet Pro M1213nf Multifunction Printer

Issue

The product performs correctly, but 'Supply Memory Error' displays on the control panel.

Model: HP LaserJet Pro M1213nf Multifunction Printer

Solution

There might be packing material inside the product.

Perform the solutions below in the order presented until your issue is resolved.

Solution one: Check to make sure that there is no packing material inside the product
Follow the steps below in the order presented to remove all packing material from inside the product.
1.   Open the cartridge access door.
Figure 1: Open the cartridge access door
2.   Lift up the paper packing material, but do not remove it.
Figure 2: Lift the paper packing material
3.   Remove the print cartridge packing material.
Figure 3: Remove the print cartridge packing material
4.   Remove the print cartridge from the product.

CAUTION: 
To prevent damage to the print cartridge, hold the print cartridge at each end.
5.   Figure 4: Remove the print cartridge
6.   
7.   Remove the packing material from inside the product.
Figure 5: Remove the packing material from inside the product
8.   Remove the orange clip from the end of the print cartridge.
Figure 6: Remove the orange clip from the print cartridge
9.   Gently rock the print cartridge back and forth to distribute the toner evenly.
Figure 7: Rock the print cartridge
10.Bend the tab on the left side of the print cartridge until the tab breaks loose. Pull the tab to remove all the sealing tape from the print cartridge.
Figure 8: Remove the sealing tape

CAUTION: 
If toner gets on your clothing, wipe it off with a dry cloth, and then wash the clothing in cold water.Hot water sets toner into the fabric .
11.Insert the print cartridge, and then close the print cartridge door.
Figure 9: Insert the print cartridge, and then close the door
 
                                              Source:HP site

Procedure to clearing the ConfigMgr (SCCM) client local cache (CCM cache) -Resolving Disk space isssue

Essentially the client cache is a temporary download location for software, applications and software updates that are deployed to a clie...